Friday, December 31, 2010

January Stamp of the Month Bloghop

I'm so excited, this is my first time ever participating in the CTMH Stamp of the Month Bloghop.  I love the creativity that happens here every month.  It's inspiring!

Thanks for stopping by.  If you've arrived here from Wendy Coffmans blog, welcome!

The January Stamp of the Month is called Find Your Style.  It's got a vintage feel. 


I've included the supply list for my cards below each card. 

I made this card with the butterfly in this stamp set...lots of little sparkly things on it.  It's hard to see on this picture, but I used Mocha Opaques and Bitty Sparkles on the leaves, and Blue-Green Assortment of Sparkles on the butterfly's body.


I used a double layer of foam mounting tape under the butterfly to really pop him up.  I also bent the wings up a bit.

TIP:  The best way to place the Bitty Sparkles and Opaques is by using the Piercing Tool tip.


Supplies Used:
Find Your Style (January Stamp of the Month)
The Present
Olive Card Stock
Bamboo Card Stock
Colonial White Card Stock
Olive Stamp Pad
Cocoa Stamp Pad
Sorbet Stamp Pad
Mocha Opaques
Bitty Sparkles
Blue-Green Assortment Sparkles
Piercing Tool (to place bitty sparkles, opaques)
Round Sponge
Foam Mounting Tape

I also made this card inspired by Linda Caler.


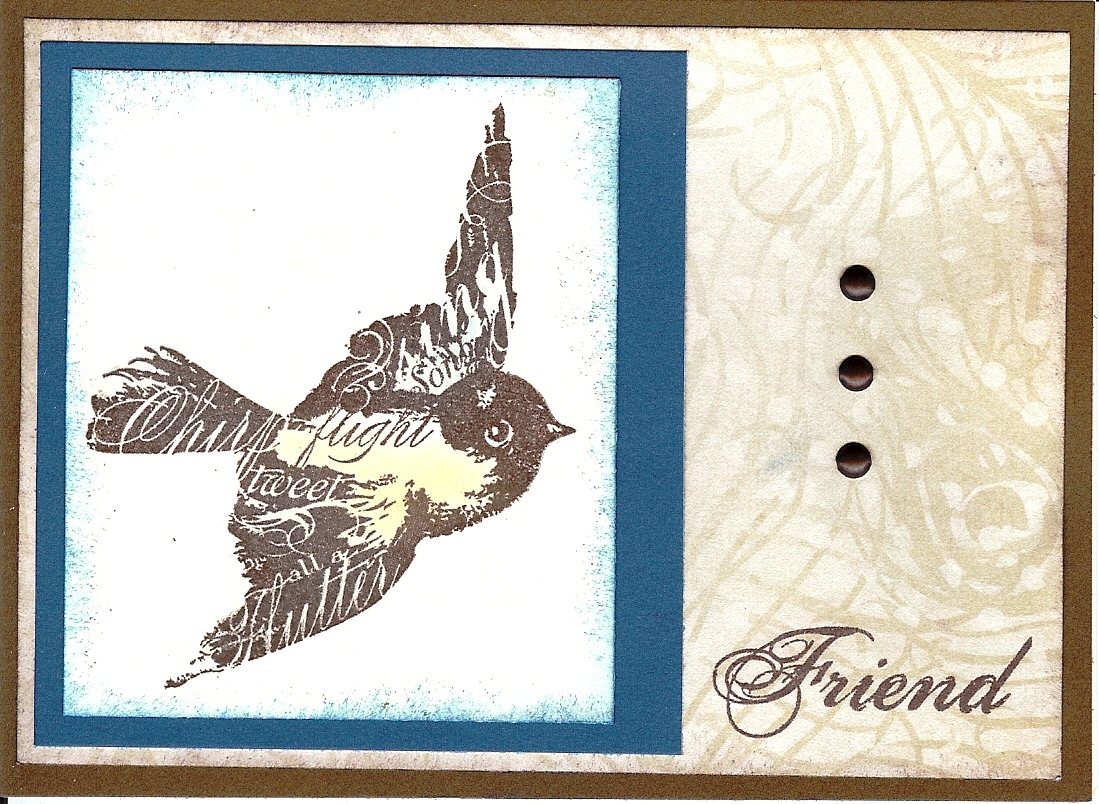
At first I stamped the bird flying downwards, and it looked like he was dive-bombing, so I leveled him out a little bit, and now he just looks like he's soaring.

Just tipping the bird a little made a difference.

Supplies Used:
Find Your Style (January Stamp of the Month)
Magnifique Paper Pack, X7127B  (Pacifica card stock, Bamboo patterned paper)
Cocoa Card Stock
Cocoa Stamp Pad
Pacifica Stamp Pad
Metal Brad Assortment
Round Sponge

If you like what you see, feel free to comment or subscribe to my blog (box is on the upper right), and you'll get my posts delivered right to your In Box!  You can even buy all the supplies used here on my website.

January is a FABULOUS time to place an order. Check out the Inspirations Brochure online, too.  During January you can get a deep discount on stamp sets shown in the Inspirations Brochure. (woo-hoo!)  You can even get the Stamp of the Month for free (or for a lot less than it would usually cost you.)

And now, hop on over to Vickie Tagatz's blog to see what goodies she has in store for you!  Happy stamping!


Tuesday, December 28, 2010

Hope your Christmas was fabulous!

Here's the last Christmas card I made this year.  It would have been a lot smarter to make the SAME Christmas card, but I guess that's kind of boring. 

I "borrowed" this card from my friend Lisa Stenz, who is incredibly talented.  


I liked the way the card turned out.  After trying it with Liquid Glass and a little glitter, I tried it with a can of spray adhesive and a LOT of glitter.  See what you get?  My mother, who thinks everything goes better with glitter, would love it.


Sorry about the naked buttons.  I only made one of these.  I was surprised how much glitter it took.

Supplies Used:
Hello There (for the branch)
Holiday Trinkets (for hanging thread)
Buttoned Together ("So Glad We're Friends")
Prisma Glitter
Pear Stamp Pad
Chocolate Stamp Pad
Pear Mini-Medley Accents
Lagoon Mini-Medley Accents
Liquid Glass
Spray Mount (spray adhesive in an aerosol can)


Tuesday, December 21, 2010

Another (Quick) Christmas Card

Well, I'm not sure that this qualifies as "quick" since there is a little bit of coloring in it, but I got the idea from my friend Tara, who sent me a Christmas card with a similar design, but it had cute printed card stock with reindeer on it) on the center strip and plain card stock on the background.  She didn't even need to stamp or color anything!  I loved the simplicity.  

I still have bunches of Christmas cards to make - I made 50 of these last night.  I stamped the snowmen, colored and glittered last night ... then let the Glitz Glitter Gel dry while I slept.  I have to finish assembling tonight and then write my cards.  yikes!  Running out of time!  And I still have to make my Mother-in-Law's scrapbooking gift!

Plus, I wanted to use up my retired stuff - my Citrus Leaf Card Stock and inks.  (That was a factor in the color choices.)

Nothing like waiting until the last minute!  (You know me, I work best under pressure!)


Supplies Used:
Snow Friends, D1244
Tag the Occasion, B1362
Feathery Flakes, D1317
Dutch Blue Card Stock
Dutch Blue Stamp Pad
Citrus Leaf Card Stock (retired, but Pear would be a great substitute)
Citrus Leaf Marker (retired)
Watermelon Stamp Pad (retired, but Cotton Candy would be a great substitute)
Watermelon Marker (retired)
Hydrangea Marker (retired, but Gypsy would be a great substitute)
Dutch Blue Marker
Topiary Marker
Glitz Glitter Gel, Z1313 (for the snow below the snowmen)
1" circle punch
Bitty Sparkles, Z1263

Monday, December 20, 2010

Owls, anyone?

I love the new colors that Close To My Heart came out with a few months ago.  They're softer than the old colors, and more updated.  I saw this card in a Close To My Heart consultant publication, and I thought it was really cute, so I duplicated it (to the best of my abilities).  The finished size is 8" x 3 1/2".  We made this card in our December Card Class.  Fun!

Card designed by the Close To My Heart Art Department

Supplies Used:
Olivia Paper Pack, X7128B
Love You Forever Stamp Set, C1398
Sunset Mini-Medly Accents, Z1338
Basic Craft Buttons, Z1206 (Colonial White Button)
Chocolate Stamp Pad
Desert Sand Stamp Pad
Watercolor Pencils
Blending Pen
Chocolate Marker
Lagoon Marker
Black Marker (for small owl's eyes)
Round Sponge (for edge distressing in Chocolate)
Lagoon Card Stock
Pewter Brads (for eyeballs)
Piercing Tool
Waxy Flax, Crystal Blue
Glue Dots
White Gel Pen (Gelly Roll Brand), for faux stitching
Foam Mounting Tape

Wednesday, December 15, 2010

Quick Gift Tag

My husband wanted some gift tags for some small gifts he was giving work-friends.  Of course, I opted for "faster, simpler and easier."  Here's what I came up with:  (I even put the stamps all on the same block, so I only had to stamp once!)


I used the (retired) stamp set Chillin' (love those polar bears!) and the "To" and "From" from Gift of Love.  You could use any stamp that had a little animal or something.

I also sponged around the edges in Blush.  Spring Iris would have been pretty, too.  It's subtle and you can't really see it in the picture, but it's there...

To apply the glitter I squirted some Liquid Glass on a scrap paper.  Then I "picked some up" and spread it with the flat side of the toothpick where I wanted the glitter to stick.  I dipped it the card in the glitter and shook off the excess.  I could have used Glitz Glitter Gel, but I am impatient and don't like to wait for the stuff to dry.  Liquid Glass dries faster.

SUPPLIES USED:
Gift of Love (C1291)
Chillin' (retired)
White Daisy Card Stock (1385)
Moonstruck Ink (Z2134)
Blush Ink (Z2106) (I sponged around the edges, but you can't see it in the picture)
Round Sponge (Z697)

Watercolor Pencils (3505) (I used Spring Iris) - but you could just use a Lilac Mist marker and skip the blending pen
Blending Pen (3174)

Liquid Glass (Z679)
Prisma Glitter (Z134)
A flat toothpick (for spreading the Liquid Glass)

Sunday, December 12, 2010

Doesn't get much easier than this!

I love to make cards that aren't too involved.  This quick and easy card uses a couple of pieces of paper and the Dimensional Elements - Flurry...and glitter.

I like the effect the sandpaper gives on the Moonstruck paper.  It makes it look snow-stormy.


Supplies Used:
Moonstruck Card Stock
Moonstruck Ink
Lilac Mist Card Stock
White Daisy Card Stock
Feathery Flakes (D1317)
Holiday Trinkets (D1366)
Dimensional Elements - Flurry
Prisma Glitter
Liquid Glass (as adhesive for the glitter) 
Sandpaper (to distress the Moonstruck Card Stock)
Round Sponge (to add a little color to the Lilac Mist Card Stock)
Bitty Sparkles (to "dot" the "I" in Christmas)

Wednesday, December 8, 2010

Pennant Card - from a Christmas Stamp Set

The other day I was working on a Christmas card using the Evergreen stamp set (D1315).  I was staring at the trees (triangles) and I realized that a few of them look just like the pennants in Party Pennants (C1429, my favorite stamp set in this Idea Book).

Evergreen (D1315)


Did you know that you can turn your stamps over (stick the front of the stamp on the block) and stamp on the flat (back) side of the stamp?  I wanted to use the triangle shape on this Christmas tree, but I didn't want to have the paisleys on on my stamped image.

I used the colors Pear, Dutch Blue, Sunflower and Holiday Red.  I stamped the same flag in different colors, so I had to clean in between each color.  The little triangle box made a cute holder for the card/pennants.


This card is all-purpose.  You can send it to anyone...just change the letters.  :)

Supplies Used:
Evergreen (D1315)
Extreme Caps (D1250)
Colonial White Waxy Flax
Pear Stamp Pad
Dutch Blue Stamp Pad
Sunflower Stamp Pad
Holiday Red Stamp Pad
Outdoor Denim Stamp Pad (for letters)

Friday, December 3, 2010

Christmas Gift Card Holder

Inspired by Tresa Black
This month, one of the cards we're making in class is a 3-D gift card holder.  This card was inspired by the fabulous Tresa Black, on her UStream video that I watched yesterday.  She really is creative!  I didn't have the Christmas tree stamp she had, but I had another symmetrical tree stamp, so that worked out fine.  :)  Plus, this is my fav. Christmas tree stamp set, Evergreen (D1315).  One year we put a bunch of small cranberry brads on the trees to make them look like ornaments.  Super fun and easy (my two favorite adjectives when it comes to card making.)

So, this card doesn't necessarily fall into the "easy" category, but I think it's worth the effort.

Take a 5"x12" piece of card stock, and score it at 3 1/2", 6" and 8 1/2"
Fold the card up in the center and down on the sides, so it looks like a "W"

With the card folded in half, measure in 3/4" from the folded edge and mark it.  Take a 1/4" hole punch and punch 1/2 of the hole at the 3/4" marks.

Then take a paper trimmer or Exacto knife and cut between the two holes, to make a card pull-out (trough).

Take a 1" punch (or similar) and punch a partial circle in the middle of the pull-out you just made.

Once again, pictures are better (at least for me)... (You can click on the picture and make it larger and print it.)


Glue the two center pieces of the fold together (gluing just on the edges, in a "U" shape), forming a pocket for your gift card in the center.  

TIP:  Tresa suggested using an adhesive that "dries hard."  I never thought about this before...You know how sometimes you make a gift card holder (or a card with a pull-out tab), and the gift card kind of sticks to the adhesive you used on the card?  That makes me just a little bit crazy.  Well, if you use an adhesive that "dries hard" like glue stick, Bonding Memories, Liquid Glass you won't have that problem.  If you use an adhesive that never dries out, and remains sticky forever (like Tombow, Terrifically Tacky Tape (redliner tape), Hermafix (Dotto Dots), or Glue Dots) you have the potential of your gift card sticking to your adhesive.  This was an AH-HA moment for me! 

SO - Use the "dries hard" kind of adhesive on the middle section.


You're basically done with the gift card part of the card.  The embellishing is the harder part of this card.  Tresa made a 3-D Christmas tree. So, I did, too, copy-catter that I am...


Stamp and cut out 3 Christmas trees.  Decorate the trees with markers.  Score them in half, folding the "pretty sides" in.  You can trim the trees or sponge the edges a bit, if you "missed a spot."

Now for the gluing instructions...If you label the backs of the trees 1,2,3 and the halves on each tree labeled Right (R) and Left (L), glue them together like this:

Side 1L gets no adhesive at this time
Side 1R attaches to 2L
Side 2R attaches to 3L
Side 3R gets no adhesive at this time
Got it?  Good!  :)

I put Bitty Sparkles on the center one (tree #2).  Don't put sparkles on the center crease.

If you don't want to do the fancy tree, just stamp ONE tree on the card stock and decorate that one.  It's still a cool gift card holder.

When you're ready to put your tree on your card, just put adhesive on Tree Side 1L and 3R and stick to your card.  One of the nice things about this gift card holder, is that even though it's 3-D, it can lay flat and will mail easily.

The striped paper I used was 4" x 7 1/2".  With the folded paper in the center, the card is a tiny, tiny bit larger than the 7" you think it is.  So you can just glue the decorative paper down and trim the excess off.

So now, you can decorate your card together with whatever you want to.  I liked the ribbon closure (22"), but you could also use Velcro dots or a spiral paper clip.  Whatever suits you!

Supplies I Used:
Evergreen (D1315)
Today's Date (D1286)
Mistletoe Paper Pack (X7130B)
New England Ivy Card Stock (included in Mistletoe Paper Pack)
Cranberry Card Stock (included in Mistletoe Paper Pack)
Colonial White Card Stock (included in Mistletoe Paper Pack)
Bamboo Card Stock (for liner in the back section) (1301)
Desert Sand Card Stock (for the tree trunk) (1273)
New England Ivy Stamp Pad (Z2135)
Cranberry Stamp Pad (Z2116)
Cocoa Stamp Pad (for sponging) (Z2114)
New England Ivy Marker (Z2335)
Gold Ribbon is from Creative Basics Mistletoe Collection (X5811)
Bitty Sparkles (Z1263)
Blue & Green Assortment of Sparkles (Z1327)
Red. Pink & Purple Assortment of Sparkles (Z1326)
Sanding Kit (for edge distressing) (Z1294)
Round Sponge (Z697)
Bonding Memories Glue (1512)

Wednesday, December 1, 2010

December Stamp of the Month - Amore

This  month, the Stamp of the Month is called Amore (D1145).  I made a simple card with this set for a party I did today.  You can use it for Valentines, or any other love-y occasion.


I used the Chocolate colored paper from Bella, but any paper that's Chocolate will do...even plain Chocolate card stock.  If you're using plain card stock, I would recommend sponging the edges with Chocolate Ink.  It just looks better...more finished.

For this card, I stamped the saying in Cocoa ink.  Also, the "Love" on the Chocolate paper is Cocoa.  I sponged Blush all around the small paper and the card base.

My favorite part of this card is the embellishments.  I used an itty bitty pearl from the Mocha Opaques pearls set at the top of the saying.  Plus, I put a bunch of Bitty Sparkles dotted around the frame.


I also put one inside the card - it's hard to tell from the picture, but the Bitty Sparkle adds a lot to the inside of the card. 


I plan on giving this card to my sweetie for Valentine's Day...that is if I can find it when the time comes! Oh, wait!  I can give it to him for our anniversary, which is this month.   Actually, I always feel like I'm cheating when I give him a hand made card.  It's like a baker giving his wife a loaf of bread as a gift.  You know, not that special, just an ordinary "work" thing.  Maybe I'll make him a mini-scrap book.  I know he likes that kind of stuff (even more than I do).

If you want to come and make this card - come to a card class this month!  I have just one - Friday, December 3 at 6:30.

Supplies Used:
Amore Stamp Set, D1445 (December Stamp of the Month)
Bella (Chocolate paper)
Blush Card Stock
Hollyhock Card Stock
Colonial White Card Stock
Blush Stamp Pad
Cocoa Stamp Pad
Round Sponge
Bitty Brads
Mocha Opaques
Chocolate Ribbon Rounds
Glue Dots (for the ribbon)